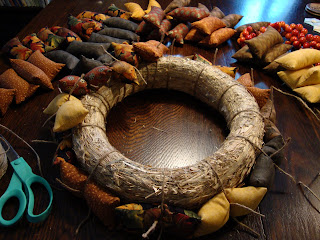
You can use any fabrics for this to create a fun seasonal decoration. To see my Christmas wreath again, click here. This wreath is going to be used to hang on my mirror for the autumn season. I created the Christmas version to use for a hurricane lamp on my table. They can be hung or laid on a table either of which creates a beautiful effect. You will need around 60 5-inch squares for a 12-inch diameter straw wreath. you could use fabrics from your stash or look at the charm packs from this shop. They are already cut to the right size which means you avoid having to cut the fabric squares yourself. This is not a difficult project so even a beginning sewer can make this with ease. So lets get started...

You will need the following items to create your own patchwork wreath:
One straw wreath with approximately 12-inch diameter
Fabrics for around 60 5-inch squares
Filling material
Rope or raffia
Decorative items like berries or miniature ornaments

Fold your squares in half with right sides together. Sew one short side and long side. The seam will have an L shape. Clip the corner and turn the pillow right sides out. Fill the pillow but not all too stiffly. They should be able to bend up as you attach them to the wreath. Sew the ends shut by hand.

Begin attaching the pillows to the wreath with either rope or raffia. I find it easiest to being with a row of them along the bottom. You can simply knot them on or make a tiny bow.

Now start adding more pillows above the bottom but be sure to change directions of the pillows as you work. One nice thing is the pillows can be slightly maneuvered even after they are attached to the wreath.

Once you are satisfied that your wreath is filled with enough pillows (be careful to check that no straw is showing except underneath), you are now ready to add any embellishments you choose. This is optional. The wreath is also beautiful with only the fabric pillows. I just wanted to make mine look a little more festive by adding some extras touches.

Have fun making these match a room or give you a seasonal touch to your home!

If you have any questions, please don't hesitate to ask.
Have a creative weekend!
16 comments:
That wreath is just darling. I can see you making these for all different events. I doubt I would ever make one, I don't think I have the patience it takes to make the pillows. Very beautiful work as usual.
Love you, Mom
Thanks for that, Heidi! I'd like to think I might have time to make a new fall wreath, but I have my doubts! I'll just pop over here for a look!
I love your wreath....the color palette is so pretty and I like the added embellishments too. Thank you for the tutorial...hugs, Linda
It looks lovely, but I dont think I'll be doing one. Lacking patience, and time!
Thanks for sharing this Heidi. This is something I want to make for Christmas, and if I have the time, maybe for Halloween.
Hugs,
Barbara/MO
OH thanks for sharing this Heidi!
I know I will be making a wreath and I think the Chix might like too also.
Your wreath looks beautiful!
Hugs2U!
I love making these! I have a wire ring but I prefer the straw wreath because I think they "hold" better! I think it's time for me start on a fall one for my table :) Thanks for reminding me...LOL
What a cute idea Heidi and thanks for the tutorial. I am printing it off to save. I have several of the Moda charm packs in my stash and this would be such a cute and inexpensive project to do. I also enjoyed seeing the photos of Annemiek's shop and glad you got to meet her.
Perfect, Heidi. I just love it and I am soooo in the mood for Fall. We went to Vermont for the day to do some shopping and we passed by a garden center that had all their Fall mums and even pumpkins for sale. I didn't dare ask my DH to stop. I think he had his fill of being my chauffeur all day.
Your wreath will be added to my 'to do' list. Thanks for sharing!
Leuk om ons zo stap voor stap te laten zien hoe je zoiets moois maakt!
Het gaat al een beetje kriebelen bij mij. Groetjes Jannet
Heidi,
It's realy lovely. Thanks for taking the time to explain it. I love both the colour themes :>)
Hugs Angela
Hi Heidi.
Hardstikke mooi,het begint al te kriebelen daar heb ik nog wel lapjes voor en dat lukt nog net met die lastige vinger laat hem zien als hij klaar is.
Joke.
What a gorgeous wreath Heidi.
I'd love to try making one of these someday.
This is my first visit to the new blog and I can see I have a lot of catching up to do.
Love the blog header.
Hugs,
Margaret
Mooi de uitleg !!
Zo'n leuke krans, al veel gezien afgelopern winter. Deze is ook al zo mooi van kleur.
Wist niet dat er in Barneveld een handwerk winkel was.
Volgend weekend is er een soort fair waar ze ook oud handwerk verkopen.
marian'ne m
Prachtige krans Heidi!Ik heb zo verleden jaar met de kerst ook diverse kransen gemaakt,een leuk werkje hé!
Heidi the wreath is amazing! I'll have to try that one soon.
Post a Comment